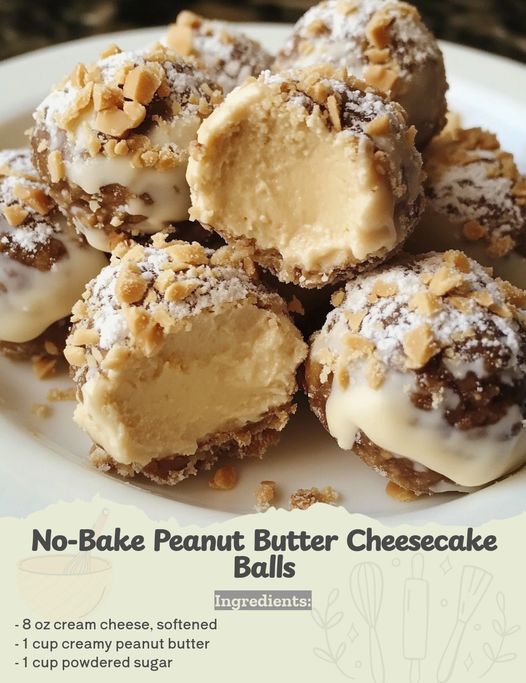
When life calls for a sweet treat with minimal effort, look no further than these No-Bake Peanut Butter Cheesecake Balls. Imagine this: a cozy evening or a festive gathering where you crave something deliciously rich yet delightfully simple. These cheesecake balls are the answer! Inspired by the creamy, dreamy flavors of classic peanut butter and chocolate, this no-bake dessert is the perfect fusion of comfort and decadence. Not only are they a crowd-pleaser, but they’re also a great make-ahead option for busy weeks or holiday parties. Each bite melts in your mouth, offering a smooth, creamy peanut butter center coated in a luscious chocolate shell—irresistible and satisfying.
Ready to make these bite-sized treats? Let’s dive into the recipe, which is surprisingly easy yet promises a big flavor payoff!
Why You’ll Love This Recipe
This no-bake recipe is ideal for several reasons:
- Simple Ingredients: You only need a few pantry staples to make these decadent treats.
- Quick Preparation: With just 15 minutes of prep time and no baking required, they come together in a breeze.
- Perfect for Any Occasion: Whether you’re making a sweet snack for movie night or a holiday party treat, these cheesecake balls are universally loved.
- No Oven Needed: Perfect for those warmer days or when you want to keep things simple without baking.
Ingredients You’ll Need
To make these delicious peanut butter cheesecake balls, gather the following ingredients:
- 8 oz cream cheese, softened – This is the base of our creamy filling. Make sure it’s softened to blend smoothly.
- 1 cup creamy peanut butter – Choose a smooth peanut butter for the best consistency. If you prefer a crunch, you could use crunchy peanut butter, but keep in mind it may affect the texture.
- 1 cup powdered sugar – Adds sweetness and helps thicken the filling.
- 1 tsp vanilla extract – A splash of vanilla adds a hint of warmth and balances the peanut butter flavor.
- 1 ½ cups graham cracker crumbs – Provides a subtle crunch and light texture to the filling.
- 1 ½ cups semi-sweet chocolate chips (for dipping) – The outer chocolate coating brings a classic, rich pairing with the peanut butter.
- 1 tbsp coconut oil or butter (for melting chocolate) – This helps the chocolate melt smoothly and creates a glossy coating.
Step-by-Step Directions
Let’s walk through the steps to create these amazing No-Bake Peanut Butter Cheesecake Balls!
Step 1: Prepare the Creamy Filling
In a large bowl, use an electric mixer to blend the softened cream cheese and peanut butter until smooth and creamy. Gradually add the powdered sugar and vanilla extract, mixing until evenly combined. This forms the base of your delicious cheesecake balls, with a rich, peanut buttery flavor.
Step 2: Add Graham Cracker Crumbs
Add the graham cracker crumbs to the mixture and gently fold them in until a thick, sticky dough forms. The graham cracker crumbs give the mixture a pleasant texture and help thicken it, making it easier to roll into balls.
Step 3: Roll into Balls
Use a tablespoon to scoop out portions of the mixture, then roll each into a small ball using your hands. Place the balls on a baking sheet lined with parchment paper to prevent sticking.
Step 4: Chill the Balls
Refrigerate the tray of cheesecake balls for about 30 minutes to let them firm up. This step is essential to make sure they hold their shape when dipped in chocolate.
Step 5: Melt the Chocolate
In a microwave-safe bowl, melt the chocolate chips with coconut oil or butter. Heat in 20-30 second intervals, stirring between each to ensure smooth, even melting. The coconut oil or butter helps the chocolate achieve a silky consistency that will coat the cheesecake balls beautifully.
Step 6: Dip the Cheesecake Balls
Once the cheesecake balls have firmed up, remove them from the fridge. Using a fork or skewer, dip each ball into the melted chocolate, making sure to coat them evenly. Allow any excess chocolate to drip off before placing the coated balls back on the parchment-lined sheet.
Step 7: Chill and Enjoy!
Return the chocolate-coated cheesecake balls to the refrigerator for an additional 30 minutes to let the chocolate set. Once firm, these peanut butter cheesecake balls are ready to be savored!
Tips for Success
For the best results, keep these helpful tips in mind:
- Soften the Cream Cheese: Make sure your cream cheese is at room temperature before mixing to achieve a smooth texture.
- Use Quality Chocolate: The chocolate is a major flavor component, so choose a quality brand of semi-sweet chocolate chips or a chocolate bar if you prefer.
- Chill Before Dipping: Firming up the cheesecake balls before dipping them in chocolate is essential. If they’re too soft, they’ll be difficult to handle and may not hold their shape well.
- Store in the Fridge: To keep them fresh, store these treats in an airtight container in the fridge. They’ll stay good for up to a week, making them a great make-ahead dessert!
Variations to Try
While these cheesecake balls are delicious as-is, here are some fun ways to customize them:
- Crunchy Twist: For extra texture, roll the cheesecake balls in crushed peanuts before dipping in chocolate.
- Different Chocolates: Try dark or white chocolate for the coating to change up the flavor profile.
- Flavored Extracts: Swap out the vanilla extract for almond or maple extract to add a unique twist to the filling.
- Holiday Decoration: Sprinkle a pinch of sea salt, festive sprinkles, or drizzle with a contrasting chocolate (like white chocolate over dark) for a holiday-ready treat.
Frequently Asked Questions
Can I Freeze These Cheesecake Balls?
Yes! You can freeze these cheesecake balls for up to 3 months. Place them in an airtight container with parchment paper between layers. Thaw in the refrigerator before serving.
What Type of Peanut Butter Works Best?
For the creamiest texture, stick with regular creamy peanut butter. Avoid natural peanut butter, as the oils can separate and make the mixture difficult to work with.
Can I Use an Alternative Sweetener?
Yes, powdered sugar substitutes like erythritol or monk fruit sweetener can be used if you’re looking for a lower-sugar option.
Perfect Pairings and Serving Suggestions
These No-Bake Peanut Butter Cheesecake Balls are versatile and pair wonderfully with:
- Coffee or Espresso: A rich cup of coffee or espresso balances the sweetness and enhances the flavors.
- Fruit: Add some fresh berries or apple slices on the side for a light and refreshing contrast.
- Wine Pairing: For an adult twist, pair these cheesecake balls with a glass of dessert wine, like port or sherry, which complements the chocolate and peanut butter flavors.
Whether you’re serving these at a party, a holiday gathering, or a simple family dessert, they’re sure to be a hit!
Nutritional Information (Approximate)
Here’s an estimated breakdown per serving (1 ball, assuming 24 servings):
- Calories: 130 kcal
- Fat: 9g
- Carbohydrates: 10g
- Protein: 3g
Why These Cheesecake Balls Are Perfect for the Holidays
The combination of peanut butter and chocolate is a classic that many people associate with comfort and indulgence. These cheesecake balls, with their creamy filling and rich chocolate coating, are a wonderful addition to any dessert spread. They’re easy to make ahead, which is ideal for busy holiday schedules, and their no-bake nature makes them quick to prepare even last minute. Plus, they’re easy to transport, making them an excellent choice for potlucks, parties, or even as edible gifts!
Share Your Creations!
We love seeing how your No-Bake Peanut Butter Cheesecake Balls turn out! If you make this recipe, be sure to share a photo on social media and tag us. Share your twist on this classic treat or any fun variations you come up with. These cheesecake balls are truly a treat worth sharing with friends, family, or even just to treat yourself!
With this easy recipe, you’re set to create a delightful treat that brings together all the comforting flavors of peanut butter and chocolate, with a texture that’s rich and creamy yet light enough to keep you coming back for more. So, gather your ingredients and get ready to roll your way to an unforgettable, crowd-pleasing dessert!


